AWS Application Load Balancer, Listeners, ACM Certifications and Route53
Suppose that you have a fleet of servers on AWS cloud and you want to balance traffic between them. Furthermore you want to make sure that network traffic is “secure” using TLS latest version.
Then the solution is to provision an Elastic Load Balancer in front of them and associate a certificate created by Aws Certificate Manager with the Load Balancer.
I will also show you how an Application Load Balancer can have multiple “Listeners”.
Create EC2 servers
Let’s start creating two EC2 servers in the same region but in different Availability Zones.
Choose the default Amazon Linux 2 ami at step1 and t2.micro at step2.
At step3 choose your default vpc and the subnet in the first available AZ. I am based in London so I have chosen my subnet based in “eu-west-1” AZ.
Scroll down at the “Advanced Details” section, enter the following bash script as “text” inside the “user data” field:
#!/bin/bash
yum update -y
yum install httpd -y
cd /var/www/html/
echo "web server 1 London" > index.html
systemctl enable httpd
systemctl start httpd
Let me explain what “user data” is: when the EC2 server will be created for first time the above code will be executed after booting procedure. User data scripts always run with “administrator” privileges.
At step 6 I created a new Security group named “ssh_http_https” allowing the following protocols for inbound rules: SSH, HTTP, HTTPS.
Launch the EC2 instance with a key that you own in that region.
Repeat the above process to create a second EC2 server. This time choose the subnet in the second availability zone. Mine was “eu-west-2”.
Enter the following code inside the “user data”:
#!/bin/bash
yum update -y
yum install httpd -y
cd /var/www/html/
echo "web server 2 London" > index.html
systemctl enable httpd
systemctl start httpd
Assign the same security group as previously and the same key pair and launch the second EC2 server.
Here is the list of my two EC2 servers up and running.

If you copy their public ip adresses and paste them in a new tab you will see the very simple web pages with text:
“web server 1 London” and “web server 2 London”


Suppose that the two EC2 servers have identical web pages. Then we can use an Elastic Load Balancer to load traffic between them. The client of the Load Balancer will not be able to know which particular server from the fleet served him.
The difference in their web content here (web server 1 vs web server 2) is an indicator to show you that the load balancer actually works and that you are servered via round robin method from one server to the other.
Create Application Load Balancer
Go to EC2 aws Service and click on “Load Balancers” link. Then Click on blue button “Create Load Balancer”.
There are various types of Load Balancers:
- Application Load Balancers for web applications that use HTTP and HTTPS (OSI Layer 7)
- Network Load Balancer for high performance network traffic using TCP, UDP and TLS (OSI Layer 3)
- Classic Load Balancer, previous generation load balancer not recommended any more.
- Gateway Load Balancer, the new load balancer launched by AWS in specific regions (OSI Layer 3)
We are going to create an Application Load Balancer.
Give a name to your ALB, leave it as “internet-facing”, leave the default HTTP listener at port 80. Later we are going to add an additional listener but for the moment leave it as it is.
Choose all your AZs, so your ALB can load balance among EC2s that belong to all of them. You could only choose the first 2 AZs as we created only 2 EC2s, but it’s OK.
Choose the same Security group that we used before.
Target Groups
At step 4 of creating an ALB you have to choose where to send the traffic. This is called “Target Group” because it is a group of servers (could be only one as well) and it works like the target where the network traffic is sent.
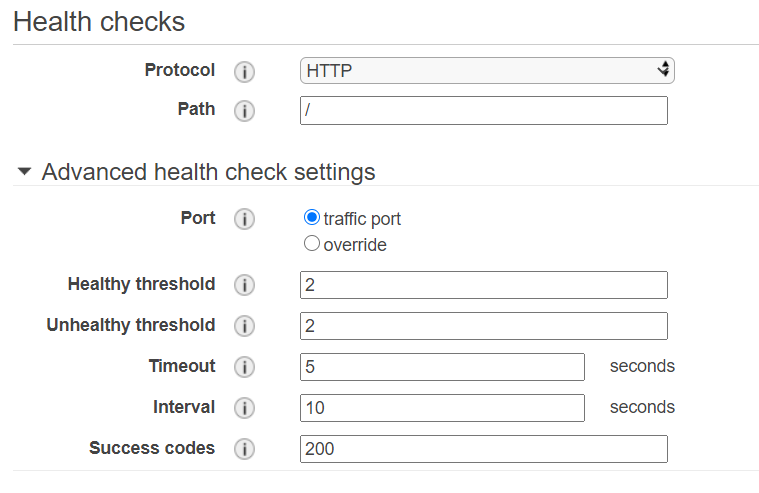
Give a name for your target group and choose the health check as the image below:

Register targets
At step 5 you have to “register” the two EC2 servers we created before. Choose both server and register them to the target group you created at the previous step.
Then launch the Application Load Balancer.
DNS name of ALB
When the question comes how to use an Application Load Balancer then the answer is using their DNS name. We never use the ip address of the ALB. We simply do not care how AWS created and in which actual ip adress it is running. We have the DNA name to use.
Copy the DNS name and paste it in your browser.

If you keep refreshing your web page you will realise that you are served from web server1 and web server2 in turns.
Create a Route53 record
You can easily register a domain name with AWS Route53 (yes it works as a registar as well ). It is very cheap, a .com domain costs $12 per year.
If you have already registered a domain name with Aws Route53 then you can create an alias Route53 record that will point to your ALB.
Then you only have to use your registered domain name instead of the long and difficult to remember DNS name of the ALB. Let me show you how you can add an alias Route53 record:
Go to “Route53” Aws service and open the “Hosted zone” of your public domain name. (When you register a domain name with Route53 it creates a Hosted zone automatically.)
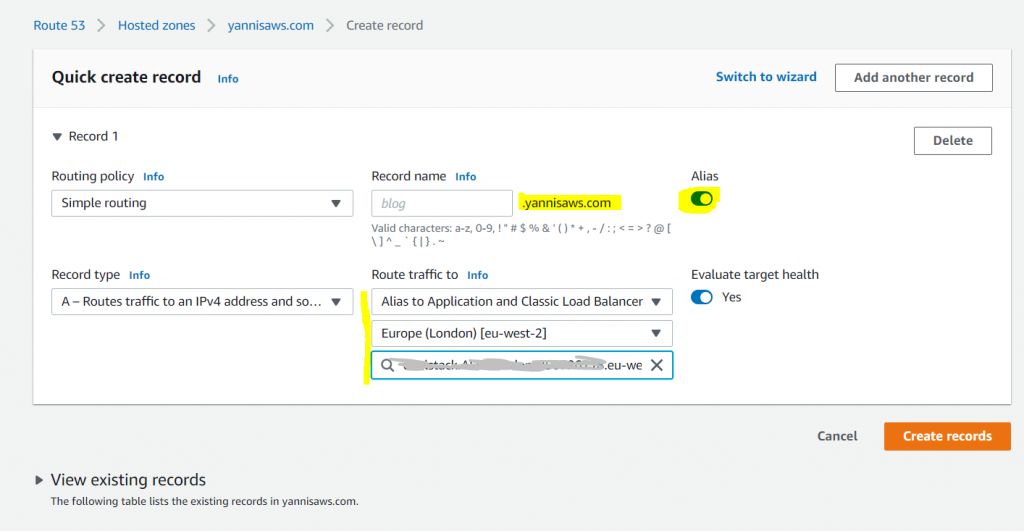
Choose the following configuration:

Pay attention to enable “alias” , then “Alias to ALB”, your region and your ALB.
alias
An alias works like a CNAME record. That means a domain name that point to another domain name.
The difference between alias and CNAME is that you can NOT use CNAME to point to a “zone apex” which means to the naked domain.
An alias is used only by AWS to point to aws resources like Application Load Balancers (and others).
In my case my registered domain is yannisaws.com. So if I wanted to use this naked domain (and not any subdomain like: www.yannisaws.com or example.yannisaws.com etc.) to point to an ALB the only way was an alias.
Now I can use this alias record to get traffic from the ALM:

Create a certificate with Certificate Manager
Go to AWS Certificate Manager service and click “Request Certificate“, then public.
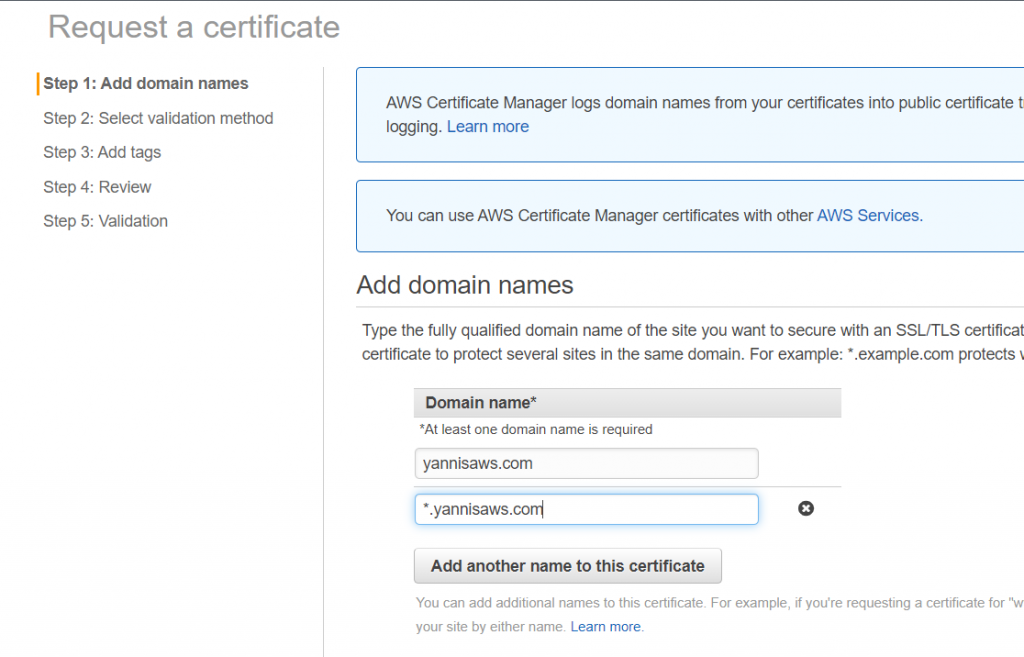
At step1 add your naked domain name and also the wildcard (*) for every subdomain, like the following image:

Leave DNS validation.
At the last step of validation, click inside each of the 2 records (one for each domain) and click to add a CNAME record inside your Route53 host zone.
If you did the previous step then in a couple of minutes your certificate will be validated and ready to be used.
(Later you can confirm the new CNAME record of Route53).
Add your CM certificate to ALB
Now it is time to add our new certificate, created by Aws Certificate Manager, to our Application Load Balancer and have also HTTPS traffic.
Go back to EC2 aws service and open your Load Balancer. Choose the second tab with label “Listeners“. As we can see we have only one Listener to port 80.
A Listener is exactly what the name declares: It listens to a specific port and can send traffic to a target group. We can have multiple listeners HTTP (port 80) and HTTPS (port 443) which can use various versions of encryption algorithms and they can send traffic to different or the same target group.
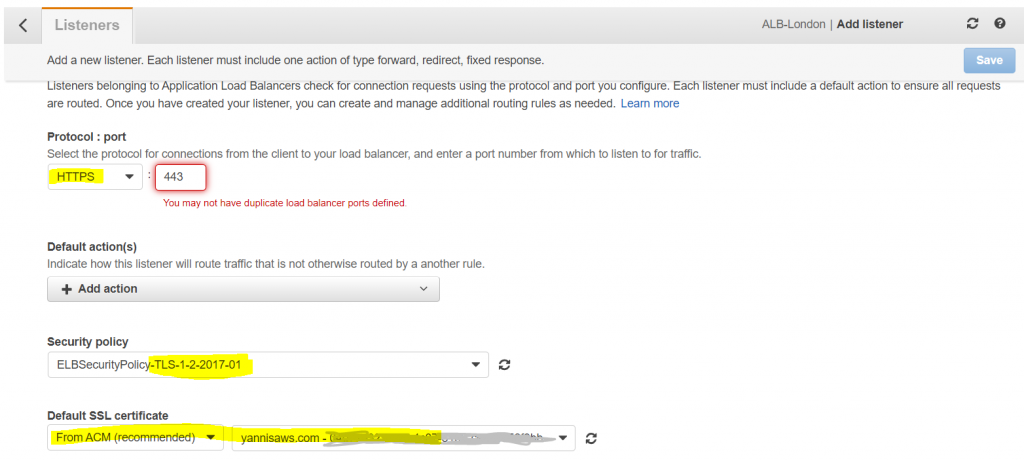
Choose protocol HTTPS, encryption TLS1.2 and choose to use your certificate created by Aws Certificate Manager:

Many Listeners for the same ALB
As you realised having created 2 Listeners we can use our Application load balancer either with HTTP or HTTPS:
- http://yannisaws.com
- https://yannisaws.com
With HTTP:

With HTTPS:

You can follow the above example, even if you haven’t registered a domain name with aws. Just use the DNS name of your ALB with http:// or https:// in front.
I hoped you liked it 😉 .
<div class='sharedaddy sd-block sd-like jetpack-likes-widget-wrapper jetpack-likes-widget-unloaded' id='like-post-wrapper-143518702-239-69015f91d68f3' data-src='https://widgets.wp.com/likes/?ver=15.1.1#blog_id=143518702&post_id=239&origin=deeplearning.org.uk&obj_id=143518702-239-69015f91d68f3' data-name='like-post-frame-143518702-239-69015f91d68f3' data-title='Like or Reblog'><h3 class="sd-title">Like this:</h3><div class='likes-widget-placeholder post-likes-widget-placeholder' style='height: 55px;'><span class='button'><span>Like</span></span> <span class="loading">Loading...</span></div><span class='sd-text-color'></span><a class='sd-link-color'></a></div>